Showing posts with label SSIS. Show all posts

Sep 9, 2010

Loop through each record in a text file : Recordset Destination

In most ETL we use Foreach loop to iterate through each file in a folder or records fetched from a table. Now the question arises how do we use Foreach loop based on each record in a text file.

Scenario: We have a text file having 2 columns, one containing source file relative path and 2nd column having the destination file relative path. The objective is to fetch each file from the source folder that are there in the our text file and move them to destination based on the connections available in the text file on the same record.

File Layout:

InputFilePath,OutputFilePath
\Input\Input1.txt,Output\Output1.txt
\Input\Input2.txt,Output\Output2.txt
\Input\Input3.txt,Output\Output3.txt

The overall package:

Package_thumb

The first Data Flow Task(DFT) uses a Flat File Source to read the data and send it to an object type user variable using Recordset Destination.

Continue……

Sep 2, 2010

Script Component–Source Part2 Retain last record


So keeping my focus on SSIS Script Component as Source I show another example. Mostly Script component is needed when source is Flat file and we need to retain the previous record value(s) to be used in the next record(s). Keeping this in mind I present the scenario:

The source file layout
1,1
2,1
3,0
4,1
5,0
6,0
7,1

Requirement: Add a third column to data and the values need to be set base on the existing 2 columns. If Column 2 value 1 set column 3 as Column 1, else set Column 3 value to the Column 1 value of the previous record.

Expected Output:

Col1 Col2 Col3
1 1 1
2 1 2
3 0 2
4 1 4
5 0 4
6 0 4
7 1 7

Output:


READ MORE HERE...

Aug 30, 2010

To use Script Component or Derived Column Transformation?? Is the question..


This is an old debate and yet not resolved. To use Script Component or Derived Column Transformation??
Yes Derived Column Transformation can NOT do all that can be done in Script Component.
Advantages of Script Component:


Read more..

Script Component–Source Part1

One of the most advance feature of SSIS is Script design capability provided be it Script Task in Control Flow or Script Component in Data Flow Task. I have seen people use the Script task pretty often but avoid Script Component because of various reasons.  Earlier I had shown how to set up user variable in Script component. Today I will demonstrate how to use Script Component as a Source for the below flat file:


Name,Rohit
Age,28
Sex,Male
Name,Mohit
Age,20
Sex,Male
Name,Ram
Age,28
Sex,Male
Name,Shyam
Age,20
Sex,Male


Notice that the Column values are coming in new rows and the column header is present in all the all the rows.

While the output should be in the following format:
Name     Age        Sex
Rohit      28          Male
Mohit      20          Male
Ram       28          Male
Shyam   20          Male


READ ON…..

Aug 16, 2010

Less known/used property: ExecValueVariable

At times I have seen in SSIS forums people ask about the way they can know the number of records updated by a query or deleted by a query in an Execute SQL Task in control flow. Even I replied at times that its not possible(in a direct manner), until I read about the property ExecValueVariable.

Read more here.

Mar 10, 2010

Using DB Mail in SSIS


In the SSIS Forum I often find people asking if it’s possible to send mail in HTML format or Fetch data from Table and use it in the mail body. In the Send Mail Task we can only send the mails in text format or send the query result as an attachment.

Today I will explain the way this can be achieved.
If we have a table with columns as ID, CustName, Amount and we need to have the mail sent in the following format. The rows will be colored based on a particular condition which can be set in the query.


Mail Header


IDCustomerNameAmount
1Sudeep100
2Ankur-10
3Manju20


Source Table Script

CREATE TABLE [dbo].[tblCust](
                
[ID] [int] IDENTITY(1,1) NOT NULL,
                
[CustName] [nvarchar](50) COLLATE SQL_Latin1_General_CP1_CI_AS NULL,
                
[Amount] [int] NULL
    )
ON [PRIMARY]


Insert Records

INSERT INTO [RAJ].[dbo].[tblCust]([CustName],[Amount])
    (
    
SELECT 'Sudeep',100
        
UNION ALL
    
SELECT 'Ankur',-10
        
UNION ALL
    
SELECT 'Manju',3 )
            
First we set up the Database Mail Profile with the following query in our SQL server.

USE msdb
GO
DECLARE @ProfileName VARCHAR(255)
DECLARE @AccountName VARCHAR(255)
DECLARE @SMTPAddress VARCHAR(255)
DECLARE @EmailAddress VARCHAR(128)
DECLARE @DisplayUser VARCHAR(128)

--Here I am setting up our Profile Name, Account Name, STMP server name, and the name that will display in the from field in the e-mail.

SET @ProfileName = 'Sudeep';
SET @AccountName = 'Sudeep';
SET @SMTPAddress = '192.168.1.101';
SET @EmailAddress = 'rajsudeep@gmail.com';
SET @DisplayUser = 'SQL Mail';

--The following section adds our Account, Profile, and Profile-Account association to the system.

EXECUTE msdb.dbo.sysmail_add_account_sp
@account_name = @AccountName,
@email_address = @EmailAddress,
@display_name = @DisplayUser,
@mailserver_name = @SMTPAddress

EXECUTE msdb.dbo.sysmail_add_profile_sp
@profile_name = @ProfileName

EXECUTE msdb.dbo.sysmail_add_profileaccount_sp
@profile_name = @ProfileName,
@account_name = @AccountName,
@sequence_number = 1 ;


Next is the query that provides us our data in HTML format which will be used in the mail body.

DECLARE @tableHTML NVARCHAR(MAX) ;
    
SET @tableHTML =
    
N'<html><body><h1>Mail Header</h1>' +
    
N'<table border="1" width="100%">' +
    
N'<tr bgcolor="gray"><td>ID</td><td>CustomerName</td><td>Amount</td></tr>' +
            
CAST((
        
SELECT
                    
td = ID, '',
                    
td = CustName, '',
            
'td/@bgcolor'=CASE WHEN Amount>0 THEN 'Green'
            
ELSE 'Red' END,
                    
td = Amount, ''
            
FROM tblCust
                    
FOR XML PATH('tr'), TYPE) AS NVARCHAR(MAX)) + N'</table></body></html>'EXEC msdb.dbo.sp_send_dbmail @recipients='<MailID@maildomain.Com>',
    
@subject = 'SQL Errors Report',
    
@body = @tableHTML,
    
@body_format = 'HTML',
    
@profile_name = 'SudeepTest';
            
 
In this query the HTML body is
formed in the variable @tableHTML, and the body format is set to ‘HTML’.
Depending on the number of records fetched in the query the HTML body that is created from the above query would looks like:


<html>
<body>
    <h1>
        Mail Header</h1>
    <table border="1" width="100%">
        <tr bgcolor="gray">
            <td>
                ID</td>
            <td>
                CustomerName</td>
            <td>
                Amount</td>
        </tr>
        <tr>
            <td>
                1</td>
            <td>
                Sudeep</td>
            <td bgcolor="Green">
                100</td>
        </tr>
        <tr>
            <td>
                2</td>
            <td>
                Ankur</td>
            <td bgcolor="Red">
                -10</td>
        </tr>
        <tr>
            <td>
                3</td>
            <td>
                Manju</td>
            <td bgcolor="Green">
                3</td>
        </tr>
    </table>
</body>
</html>

If you need any kind of modification in your table look and feel you could think about the related HTML that you need and modify the above query accordingly.
Now in the SSIS Package that you have use the 2nd query in Execute SQL Task and check the mail that you receive.
It is not necessary that it can be used for tables. You can modify the select statement in the above query to return the data as HTML format without FROM clause or simply put your 
HTML code in the @tableHTML variable.

Prerequisites:
  • ·         The SMTP server should be installed and configured
  • ·         The user in the profile should have access to the SMTP Server
  • ·         Check the SMTP server for the domains to which it can broadcast mails.

Feb 26, 2010

Sample Packages

I am uploading a few sample packages that you could use and modify as per your requirement. Let me know if you need any specific sample or any change in these packages.

This package shows an example where the file connection is changed dynamically based on inputs from the database table. This package includes Execute SQL Task, Foreach Loop with ADO Enumerator, Data Flow Task including Flat File Connection Manager, Derived Column for date transformation, OLEDB Destination and Flat File destination for error records. For step by step description check this post.

This package picks files from folder and deletes files based on the file name. It makes use of Foreach Loop, dummy Script Task, Precedence Constraint and File System Task.

This is a simple package where I just show how we remove duplicates from the records and perform lookup with no caching. This package includes Sort Transform, Lookup Transform, Flat File Source and OLEDB Destination.


QueryFromFile.dtsx
This package executes a set of queries kept in a folder using For Each Loop and Execute SQL Task 

I will be uploading more samples soon.


Update1:
SQLXMLtoFile.dtsx
This package takes a XML stream from Execute SQL task as output and uploads the file to a XML File. The SQL Query could be of any form like:
SELECT * FROM Table1 FOR XML Auto
or
SELECT * FROM Table1 FOR XML PATH('Test')


Update2:
DeleteOldestFile.dtsx
This package will delete the oldest file from a given folder. The filename is of the format File_MMDDYYYY.txt For more details on this package I will be posting a blog soon.

Nov 24, 2009

Dynamic file handling and formatting dateTime.

Hi,
I’m back with the second post. As I said I would be updating on how to set the file name dynamically for multiple files kept in a folder or different folder.
Point to note that all the files have the same metadata.
Scenario:
For simplicity sake I will be using a case where the file names and file paths are saved in a DB table. There is an ID auto increment field to based on which the files need to be picked and inserted into the destination Table.
The above table’s Schema is:


You can download this package from here.

CREATE TABLE [dbo].[FileConfig](
[ID] [int] IDENTITY(1,1) NOT NULL,
[FileName] [nvarchar](50) COLLATE SQL_Latin1_General_CP1_CI_AS NULL,
[FilePath] [nvarchar](max) COLLATE SQL_Latin1_General_CP1_CI_AS NULL
) ON [PRIMARY]

The input file data is comma delimited
The destination is SQL Table.
The data will be modified as per the definition given below.


Input  File Columns
Output  File Columns
ID -> String
ID -> unsigned Integer
FName -> String(50)
FName -> String(50)
LName -> String(50)
LName -> String(50)
Age -> String
Age -> unsigned Integer
DOB > String(DD/MM/YYYY)
DOB > DateTime


So the Package will look like this:


Create 2 string Variable: FileName and FilePath with the scope as the package(Practice in my case). Set the value of the variable to a file name and path that exists (I set it to “File1.txt” & “C:\SSIS\Practice\Files”) just while development.
Next create an object variable(ObjfileDetails) to store the result set from the initial Execute SQL Task.


Now set up the Execute SQL Task to get the file name and path. We save the full result set to an object variable.
ResultSet : Full Result Set
ConnectionType : OLEDB(that’s what I have used you could also use ADO.NET)
Connection : Select the appropriate one.
Note: it is ordered by ID column.


Set up the Result set as shown in figure


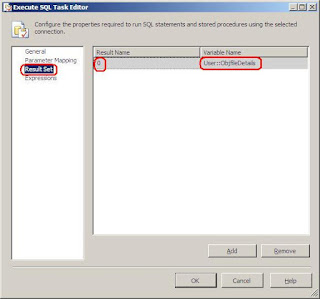
Note: The Result Name is set to 0.
Once the SQL Task will be executed this object variable will containing the entire result set returned by the query.
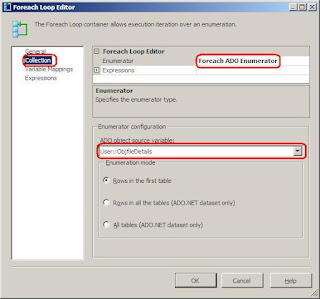
In the collections tab do the below settings:
Use the object variable in the For each loop.
Set the enumerator to Foreach ADO Enumerator.


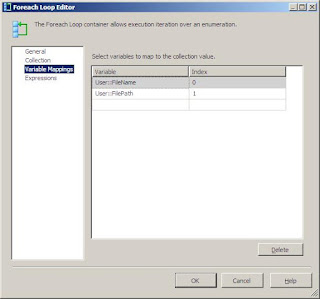
Next goto the Variable mapping and do the below mentioned settings:
Select the 2 string variable to which the file name and file path will be saved for each iteration of the object variable.

Note: Set the index starting from 0 and the order should be same as the order of the columns fetched in the SELECT query above.

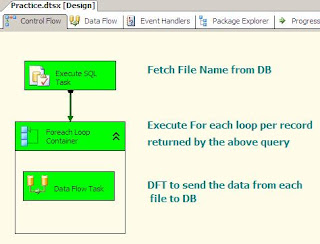
Once this is done we put a Data Flow Task(DFT) in the above For Each Loop.
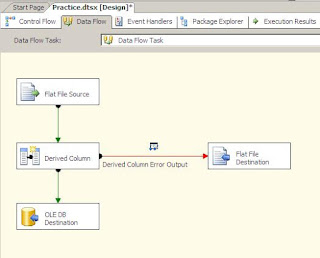
In the DFT use:
1. Flat File Source to fetch the data from the input file.
2. Derived Column transformation to change the string date field to DB_DBDATE
3. OLEDB Destination to send the valid records to database table.
4. Flat File destination to log the error records.
Let’s have a look at the layout of the DFT.


In the Flat file source we make a new connection manager where we set browse and set the file path of an existing file.
In the Advanced tab set the Column Names as per the need and set the data type to which you can convert the data without the loss of information like the numeric columns. Leave the other to default or set the max width of the string columns.


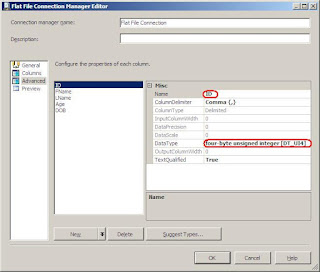
Once the Flat File connection manager is set up select the columns you need in the flow and your done.
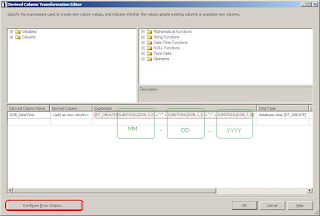
Next connect the Flat File Source to the Derived column to change the DOB column to DT_DBDATE format.
To do this in the derived column add a new column give it a name and set the expression to :
(DT_DBDATE)(SUBSTRING(DOB,4,2) + "-" + SUBSTRING(DOB,1,2) + "-" + SUBSTRING(DOB,7,4))
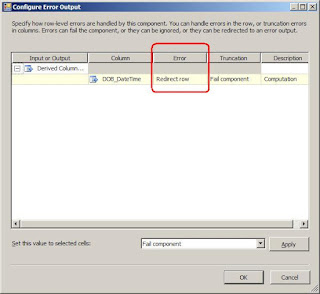
Once the expression is set click the Configure Error Output button at the bottom.

In case of error in the Derived Column transform (e.g. the date field is No Value, “00/00/000” or any invalid date) set it to redirect row so that it can be logged and analyzed.


For the correct records send the data to Table
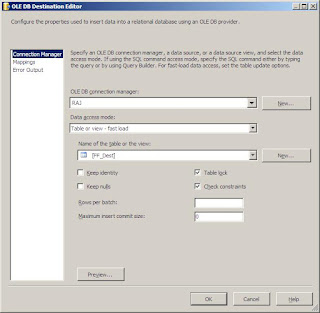
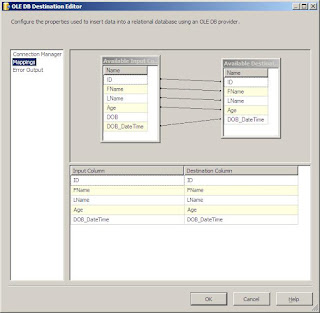
In the OLEDB Destination:
Select the OLEDB Connection needed to connect to the destination Data base.
Select the table where the columns need to be inserted.


Goto the mapping
Go the mapping and do the mapping as required and click OK.


For the error records(red arrow) after the derived Column set a flat file destination to log the error records.
The DFT is now all set.
Now the DFT Flat File source needs to be made dynamic.
To achieve this follow the steps below.
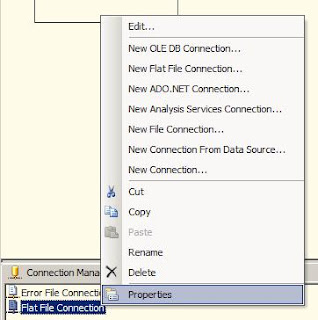
Goto the connection manager right click-> Properties


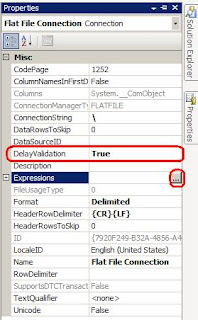
In the properties pane for the above connection manager:
Set the DelayValidation to True
Expand the Expressions by clicking the ellipse.


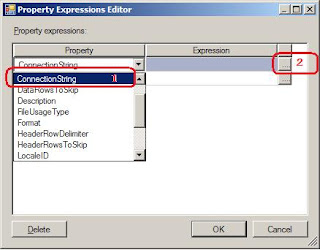
On the Property Expressions Editor window:
In the Property column select the ConnectionString property from the drop down list.
Now expand the Expression column by clicking the ellipse. An Expression Builder window will pop up.

On the Expression Builder window:
Set the Expression as: @[User::FilePath]+ “\\” + @[User::FileName]
Click the Evaluate expression button at the left hand bottom to see if the expression is creating the desired output.
Click OK.
Click OK on the Property Expression Editor as well.


Save and build the package.
Now when you execute the package the package will take the filenames from the DB table and dump the data in order in the final table.


Let me know if you need any further clarification or I am not clear in any step.